
Sponsored
Sponsor This Blog
Connect with a targeted audience of iOS developers and Swift engineers. Promote your developer tools, courses, or services.
Learn More →In a previous post, we discussed how to create an MCP server in Swift. If you're new to MCP, I recommend reading it first.
There are plenty of MCP clients out there, but most of them are desktop apps. As an iOS developer, I wondered how to use MCP in an iOS app. In this post, we'll implement a simple chat with Claude LLM. As an example of MCP server, we'll get blood pressure data from HealthKit.
Prefer audio format? Listen to the blog post below:
Implementing MCP Server for HealthKit
Let's start with an abstract protocol for our MCP server:
import Foundation

protocol MCPServerProtocol {
    var tools: [Tool] { get }
    func call(_ tool: Tool) async throws -> String
}
Based on Tool docs, we'll create a Tool struct to represent a function that can be called by the client:
struct Tool: Encodable {

    enum CodingKeys: String, CodingKey {
        case name, toolDescription = "description", input_schema
    }

    let name: String
    let toolDescription: String
    let input_schema: [String: String]
}
Now, let's implement BloodPressureService that will be our MCP server:
final class BloodPressureService: MCPServerProtocol {

    var tools: [Tool] = [
        Tool(name: "blood_pressure",
             toolDescription: "Get the latest blood pressure (systolic and diastolic) from Apple Health.",
             input_schema: ["type": "object"])
    ]
}
Here we define a blood_pressure tool that will be used to get the latest blood pressure data from Apple Health. We'll not use any input parameters for this tool, but according to the docs input_schema is required.
Next, we'll implement the call method to handle the tool call:
func call(_ tool: Tool) async throws -> String {
    guard tool.name == "blood_pressure" else {
        // Custom error
        throw Error.toolNotSupported
    }
    let (systolic, diastolic) = try await fetchLatestBloodPressure()
    return "\(Int(systolic))/\(Int(diastolic))"
}
Now, let's implement the fetchLatestBloodPressure function:
private lazy var healthStore = HKHealthStore()

private let systolicType = HKQuantityType(.bloodPressureSystolic)
private let diastolicType = HKQuantityType(.bloodPressureDiastolic)
private let bloodPressureType = HKCorrelationType(.bloodPressure)

private func fetchLatestBloodPressure() async throws -> (systolic: Double, diastolic: Double) {
    // Request authorization
    try await healthStore.requestAuthorization(toShare: [], read: [systolicType, diastolicType])

    // Fetch the latest blood pressure data
    let descriptor = HKSampleQueryDescriptor(predicates: [.sample(type: bloodPressureType)], sortDescriptors: [])
    let samples = try await descriptor.result(for: healthStore)
    guard let sample = samples.first as? HKCorrelation else {
        // Custom error
        throw Error.missingBloodPressureData
    }
    guard let systolic = sample.objects(for: systolicType).first as? HKQuantitySample,
            let diastolic = sample.objects(for: diastolicType).first as? HKQuantitySample else {
        // Custom error
        throw Error.missingBloodPressureData
    }

    let systolicValue = systolic.quantity.doubleValue(for: .millimeterOfMercury())
    let diastolicValue = diastolic.quantity.doubleValue(for: .millimeterOfMercury())
    return (systolicValue, diastolicValue)
}You can test HealthKit in iOS Simulator. Open the Health app, select the Browse tab, search for "Blood Pressure" and add a sample to the simulator.
To add a HealthKit data access to your app, you need to add HealthKit capability and update Info.plist file with NSHealthShareUsageDescription key.
Now we can test the service:
let bloodPressureService = BloodPressureService()
Task {
    let result = try await bloodPressureService.call(bloodPressureService.tools[0])
    print(result) // Prints a sample output: 123/78
}
Using Anthropic API for messaging
To implement a chat with Claude LLM, we'll use Anthropic API for messaging. Let's create a AnthropicService that will be used in our MCP client:
import Foundation

final class AnthropicService {

    private let apiKey: String
    private let tools: [Tool]

    init(apiKey: String, tools: [Tool]) {
        self.apiKey = apiKey
        self.tools = tools
    }

    func send(messages: [Request.Message]) async throws -> Response {
        var request = URLRequest(url: URL(string: "https://api.anthropic.com/v1/messages")!)
        request.httpMethod = "POST"
        request.setValue(apiKey, forHTTPHeaderField: "x-api-key")
        request.setValue("2023-06-01", forHTTPHeaderField: "anthropic-version")

        let body = Request(model: "claude-3-opus-20240229", messages: messages, max_tokens: 1024, tools: tools)
        let encoder = JSONEncoder()
        request.httpBody = try encoder.encode(body)

        let (data, _) = try await URLSession.shared.data(for: request)

        return try JSONDecoder().decode(Response.self, from: data)
    }
}
For initializing the AnthropicService, we need to provide an API key and a list of tools. You can get an API key from Anthropic Dashboard. The tools array will be used to register the tools available to the assistant during the chat.
Here is the Request struct that will be used to send messages to the Anthropic API:
import Foundation

struct Request: Encodable {
    let model: String
    let messages: [Message]
    let max_tokens: Int
    let tools: [Tool]?

    struct Message: Encodable {
        enum Role: String, Encodable {
            case user
            case assistant
        }

        let role: Role
        let content: [Content]
    }
}
Here is the Response struct:
import Foundation

struct Response: Decodable {
    let content: [Content]
}
You may notice a Content object in both Request and Response structs. It represents a message in the chat and has the same structure:
enum Content: Codable {
    case text(text: String)
    case toolUse(id: String, name: String, input: [String: String])
    case toolResult(toolUseId: String, content: String)

    private enum CodingKeys: String, CodingKey {
        case type, text, id, name, input, tool_use_id, content
    }

    init(from decoder: Decoder) throws {
        // Custom decoding
    }

    func encode(to encoder: Encoder) throws {
        // Custom encoding
    }
}
To simplify usage, we'll use an enum to represent the content:
text— a regular text messagetoolUse— a tool call by the assistanttoolResult— a tool result by the MCP client
Implementing MCP Client
Now, let's implement the MCP client. It will show a chat with the assistant and a text field to send messages to the assistant.
import SwiftUI

struct ContentView: View {
    @State private var viewModel = ContentViewModel()

    var body: some View {
        // Chat messages
    }
}
Here is the ContentViewModel that will handle the chat logic:
import SwiftUI
import Observation

@Observable
final class ContentViewModel {
    var messages: [ChatMessage] = []
    var inputText: String = ""
    var isLoading: Bool = false

    private let mcpServerService: MCPServerProtocol
    private let anthropicService: AnthropicService

    init() {
        self.mcpServerService = BloodPressureService()
        self.anthropicService = AnthropicService(
            apiKey: "YOUR_API_KEY",
            tools: mcpServerService.tools
        )
    }
}
Here we initialize the BloodPressureService and AnthropicService. To update the chat, we'll use messages array. The ChatMessage struct simplifies usage of the Request.Message struct:
struct ChatMessage: Identifiable {

    let message: Request.Message

    var id: UUID = .init()

    var content: String {
        message.content
            .map { content in
                switch content {
                case .text(let text):
                    text
                case .toolUse(_, let name, _):
                    "Called MCP Tool: \(name)"
                case .toolResult(_, let content):
                    "Result: \(content)"
                }
            }
            .joined(separator: "\n")
    }
}
In ContentView, we'll use a ScrollView with a LazyVGrid to show the chat messages and a TextField to send messages to the assistant:
var body: some View {
    ScrollView {
        LazyVGrid(columns: [GridItem(.flexible())], spacing: 8) {
            ForEach(viewModel.messages) { message in
                let isUser = message.message.role == .user
                VStack {
                    Text(message.content)
                        .padding(8)
                        .background(isUser ? Color.blue.opacity(0.2) : nil)
                        .cornerRadius(8)
                }
                .frame(maxWidth: .infinity, alignment: isUser ? .trailing : .leading)
            }
        }
        .padding()
    }
    .safeAreaInset(edge: .bottom) {
        HStack {
            TextField("Type a message...", text: $viewModel.inputText, axis: .vertical)
                .textFieldStyle(.roundedBorder)
                .disabled(viewModel.isLoading)
            Button("Send") {
                viewModel.sendMessage()
            }
            .disabled(viewModel.inputText.isEmpty || viewModel.isLoading)
        }
        .padding()
        .background(.white)
    }
}
Now, let's implement the sendMessage method:
func sendMessage() {
    let requestMessage = Request.Message(role: .user, content: [.text(text: inputText)])
    messages.append(.init(message: requestMessage))
    inputText = ""
    isLoading = true

    let requestMessages = messages.map(\.message)

    Task {
        do {
            let response = try await anthropicService.send(messages: requestMessages)
            let message = ChatMessage(message: .init(role: .assistant, content: response.content))
            self.messages.append(message)
        } catch {
            print("Error: \(error)")
        }
        self.isLoading = false
    }
}
Pay attention to the role of the messages. In case of wrong roles you'll get an error from the API.
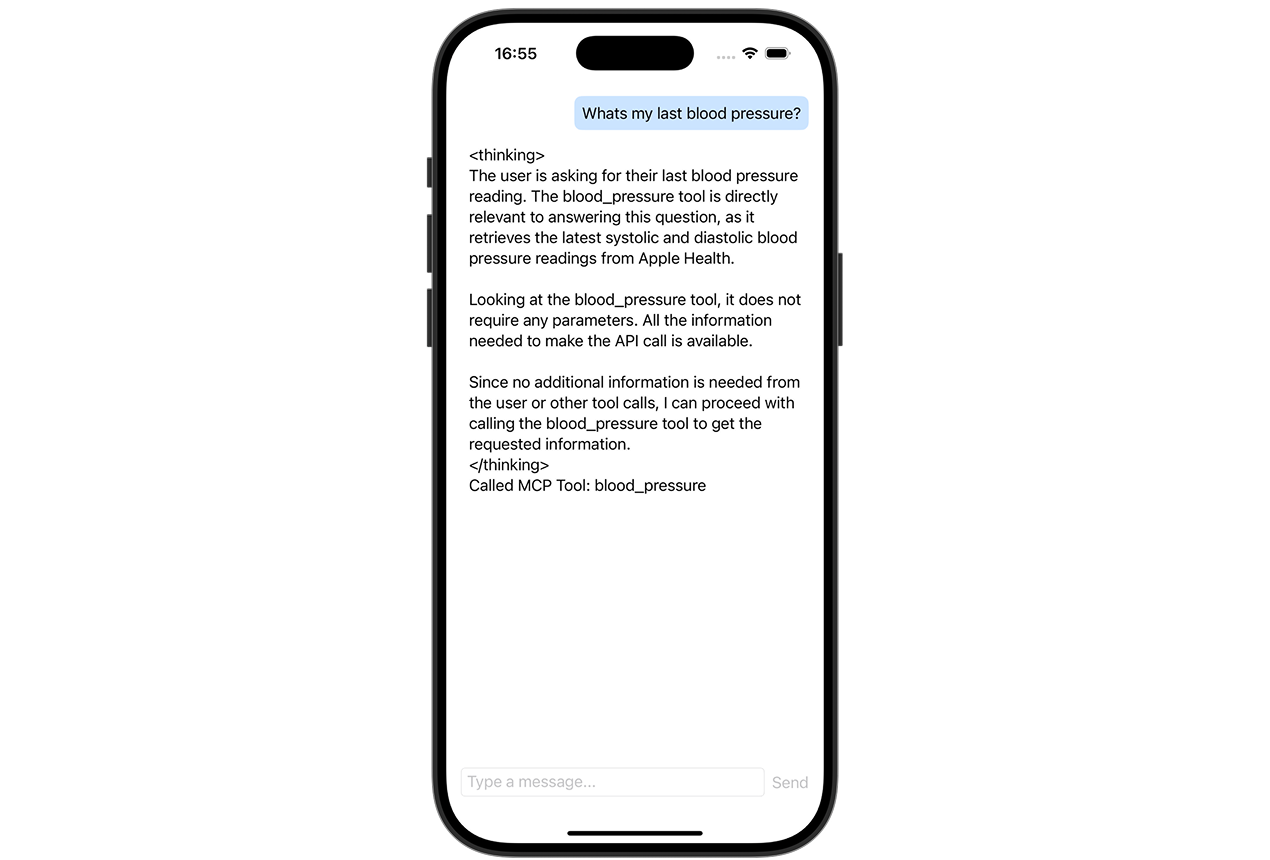
Now we're ready to send a message to the assistant. Let's run the app and send a message like "Whats my last blood pressure?". In the request body, we'll see our messages and the tools that can be used:
{
  "messages": [
    {
      "content": [
        {
          "text": "Whats my last blood pressure?",
          "type": "text"
        }
      ],
      "role": "user"
    }
  ],
  "max_tokens": 1024,
  "model": "claude-3-opus-20240229",
  "tools": [
    {
      "description": "Get the latest blood pressure (systolic and diastolic) from Apple Health.",
      "input_schema": {
        "type": "object"
      },
      "name": "blood_pressure"
    }
  ]
}
Let's see the response from the assistant. It may look like this:
{
  "id": "msg_01Jf3zsSaK4nGVASwx8Qqk34",
  "type": "message",
  "role": "assistant",
  "model": "claude-3-opus-20240229",
  "content": [
    {
      "type": "text",
      "text": "<thinking>\nThe `blood_pressure` function from the Apple Health API is directly relevant to answering the user's request for their last blood pressure reading. This function does not require any parameters, so we have all the necessary information to make the API call.\n</thinking>"
    },
    {
      "type": "tool_use",
      "id": "toolu_01QmsfxcBXhf6Vrwa4Gb6H22",
      "name": "blood_pressure",
      "input": {}
    }
  ],
  "stop_reason": "tool_use",
  "stop_sequence": null,
  "usage": {
    "input_tokens": 593,
    "cache_creation_input_tokens": 0,
    "cache_read_input_tokens": 0,
    "output_tokens": 92
  }
}
When the assistant responds, the app will display a new message from the assistant:
After getting the response, we need to handle the tool use:
// in sendMessage()
for content in response.content {
    switch content {
    case .toolUse(let id, let name, _):
        try await useTool(withID: id, name: name)
    case .text, .toolResult:
        continue
    }
}
Now, let's implement the useTool method:
private func useTool(withID id: String, name: String) async throws {
// 1. Find the tool by name
guard let tool = mcpServerService.tools.first(where: { $0.name == name }) else {
print("Tool with name \(name) not found.")
return
}
// 2. Create the tool result content
let content = try await mcpServerService.call(tool)
let toolResultMessage = Request.Message(
role: .user,
content: [.toolResult(toolUseId: id, content: content)]
)
self.messages.append(.init(message: toolResultMessage))
// 3. Send the tool result message
let requestMessages = self.messages.map(\.message)
let response = try await anthropicService.send(messages: requestMessages)
let message = ChatMessage(message: .init(role: .assistant, content: response.content))
self.messages.append(message)
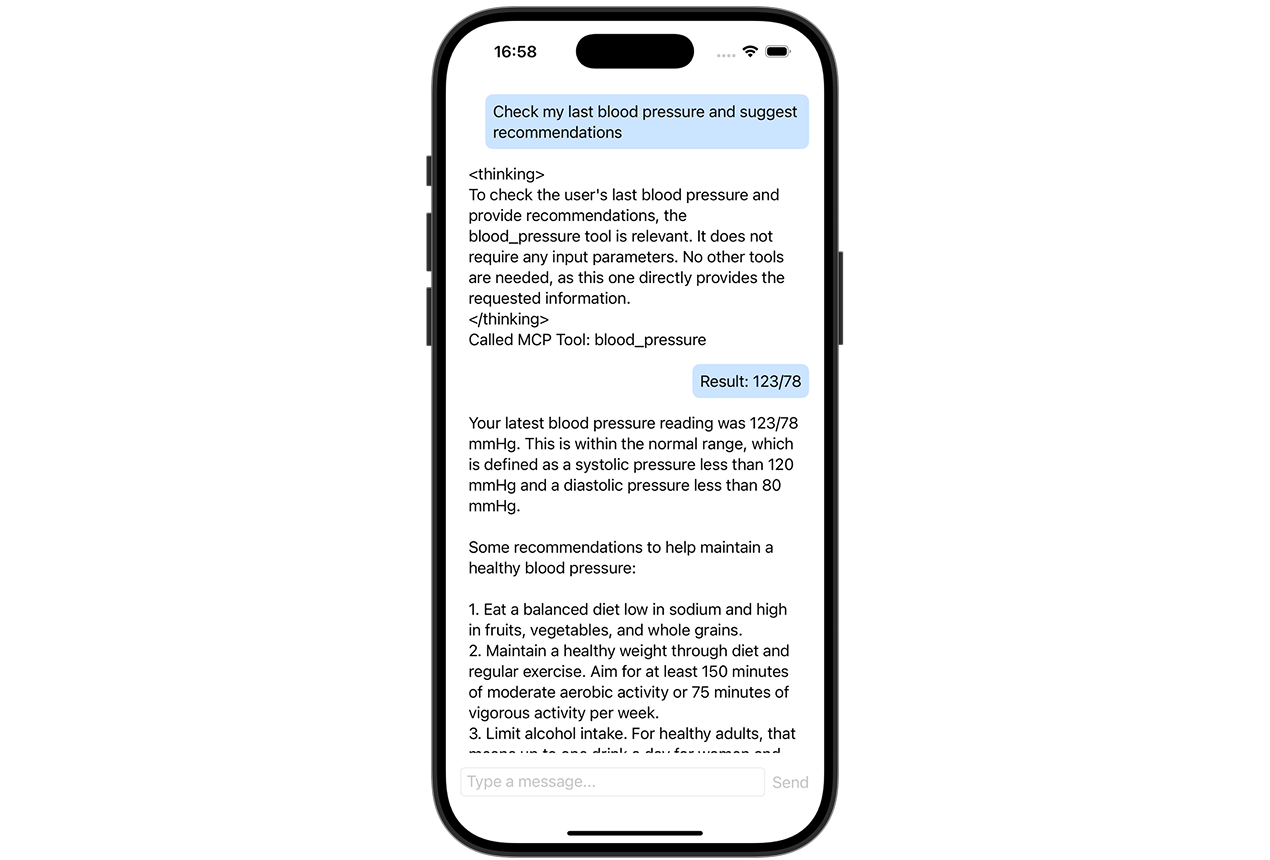
}Every tool result must have a tool_use_id that matches the id of the tool use. To save a chat context, we need to update the messages and send them again to the assistant. Here is the final response:
Conclusion
Model Context Protocol is a powerful way to integrate LLM into your app. In context of iOS development, it also may be useful for accessing local and remote data and enriching the user experience.
The full code of the app is available on GitHub.